关于BufferedReader的mark(int),mark()解惑
相信BufferedReader应该是大家所熟悉的一个操作类,但是其中的mark,reset方法,不知大家是否有过关注,
近日工作中碰到问题,不解,所以就Google并记录下来,给自己个记录,也希望与大家分享。
关于BufferedReader:
public class BufferedReader
extends Reader

Read text from a character-input stream, buffering characters so as to provide for the efficient reading of characters, arrays, and lines.

The buffer size may be specified, or the default size may be used. The default is large enough for most purposes.

In general, each read request made of a Reader causes a corresponding read request to be made of the underlying character or byte stream. It is therefore advisable to wrap a BufferedReader around any Reader whose read() operations may be costly, such as FileReaders and InputStreamReaders. For example,

 BufferedReader in
   = new BufferedReader(new FileReader("foo.in"));


will buffer the input from the specified file. Without buffering, each invocation of read() or readLine() could cause bytes to be read from the file, converted into characters, and then returned, which can be very inefficient.

Programs that use DataInputStreams for textual input can be localized by replacing each DataInputStream with an appropriate BufferedReader.

Since:
    JDK1.1
See Also:
    FileReader, InputStreamReader
关于它的mark,reset方法:
public class BufferedReader
extends Reader

Read text from a character-input stream, buffering characters so as to provide for the efficient reading of characters, arrays, and lines.

The buffer size may be specified, or the default size may be used. The default is large enough for most purposes.

In general, each read request made of a Reader causes a corresponding read request to be made of the underlying character or byte stream. It is therefore advisable to wrap a BufferedReader around any Reader whose read() operations may be costly, such as FileReaders and InputStreamReaders. For example,

 BufferedReader in
   = new BufferedReader(new FileReader("foo.in"));


will buffer the input from the specified file. Without buffering, each invocation of read() or readLine() could cause bytes to be read from the file, converted into characters, and then returned, which can be very inefficient.

Programs that use DataInputStreams for textual input can be localized by replacing each DataInputStream with an appropriate BufferedReader.

Since:
    JDK1.1
See Also:
    FileReader, InputStreamReader
reset

public void reset()
           throws IOException

    Reset the stream to the most recent mark.

    Overrides:
        reset in class Reader

    Throws:
        IOException - If the stream has never been marked, or if the mark has been invalidated
在项目中有如下代码:
protected static String readToTag(BufferedReader br)
    {
        String string = "";
        try
        {
            br.mark(9);
            int charVal = br.read();

            while (charVal != '<' && !isFileEnd(br))
            {
                if(charVal == '\r'){
                        currentLineNo ++;
                }

                string += (char)charVal;
                br.mark(9);
                charVal = br.read();
            }

            br.reset();
            if (isFileEnd(br) && charVal>0)
            {
                string += (char)charVal;
            }

            return (string);
        }
        catch (IOException ioe)
        {
            Message.show(Message.error, ioe.getMessage());
            return (null);
        }
    }
其功能是:在html文件解析中,读取当前BufferedReader至第一个tag。
其实,BufferedReader的功能是有很多用处的,比如统计文件行数,在html中读取发现tag后再将文件指针返回指向tag前面的位置;
1.在上面的code中,我查阅后(原作者已离职)的理解是:此处就是要在当前处mark一下,读取下一个char后,判断是否'<',重复画线处,直到发现'<',然后返回tag前的文本;则此处的9(就是这个9害我思索许久),不一定是9,可以是8,7...2,后面只读一次就又mark了; 1不行(后面讨论)。
2.在文件读取中,使用mark方法时,要注意,要设置mark参数int readAheadLimit=file.length + 1,否则就会爆出异常java.io.IOException: Mark invalid.
原因在于:
jdk中声明:
readAheadLimit - Limit on the number of characters that may be read while still preserving the mark. After reading this many characters, attempting to reset the stream may fail. A limit value larger than the size of the input buffer will cause a new buffer to be allocated whose size is no smaller than limit. Therefore large values should be used with care.
英文声明可能有些confused,来看中文的:
readAheadLimit - 在仍保留该标记的情况下,对可读取字符数量的限制。在读取达到或超过此限制的字符后,尝试重置流可能会失败。限制值大于输入缓冲区的大小将导致分配一个新缓冲区,其大小不小于该限制值。因此应该小心使用较大的值。 //就是建议使用大于最大值的值
给大家一段代码可以参考运行:
import java.io.BufferedReader;
import java.io.CharArrayReader;
import java.io.IOException;

public class BufferedReaderDemo {
    public static void main(String[] args) throws IOException {
        String s = "Message.show(Message.error, ioe.getMessage()).一";
        char buf[] = new char[s.length()];
        s.getChars(0, s.length(), buf, 0);
        CharArrayReader in = new CharArrayReader(buf);
        BufferedReader f = new BufferedReader(in);
        String d = "";
        int c;
        System.out.println(s.length() );
        f.mark(s.length() +1);
        while ((c = f.read()) != -1) {
            d += (char)c;
        }
        f.reset();
        System.out.println(d);
    }
}
浅谈Android五大布局
Android的界面是有布局和组件协同完成的,布局好比是建筑里的框架,而组件则相当于建筑里的砖瓦。组件按照布局的要求依次排列,就组成了用户所看见的界面。Android的五大布局分别是LinearLayout(线性布局)、FrameLayout(单帧布局)、RelativeLayout(相对布局)、AbsoluteLayout(绝对布局)和TableLayout(表格布局)。
LinearLayout:
LinearLayout按照垂直或者水平的顺序依次排列子元素,每一个子元素都位于前一个元素之后。如果是垂直排列,那么将是一个N行单列的结构,每一行只会有一个元素,而不论这个元素的宽度为多少;如果是水平排列,那么将是一个单行N列的结构。如果搭建两行两列的结构,通常的方式是先垂直排列两个元素,每一个元素里再包含一个LinearLayout进行水平排列。
LinearLayout中的子元素属性android:layout_weight生效,它用于描述该子元素在剩余空间中占有的大小比例。加入一行只有一个文本框,那么它的默认值就为0,如果一行中有两个等长的文本框,那么他们的android:layout_weight值可以是同为1。如果一行中有两个不等长的文本框,那么他们的android:layout_weight值分别为1和2,那么第一个文本框将占据剩余空间的三分之二,第二个文本框将占据剩余空间中的三分之一。android:layout_weight遵循数值越小,重要度越高的原则。显示效果如下:
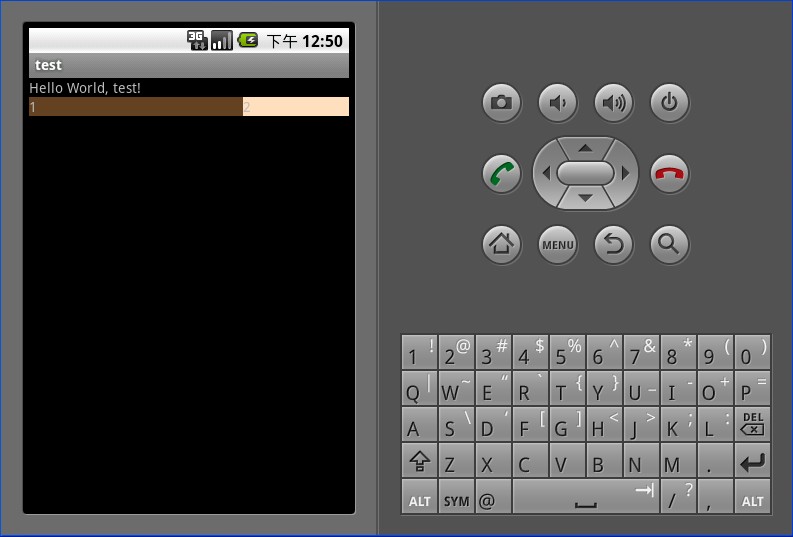
<?xml version="1.0" encoding="utf-8"?>
 <LinearLayout xmlns:android="http://schemas.android.com/apk/res/android" android:orientation="vertical" android:layout_width="fill_parent" android:layout_height="fill_parent">
     <TextView  android:layout_width="fill_parent" android:layout_height="wrap_content" android:background="#ff000000" android:text="@string/hello"/>
     <LinearLayout android:orientation="horizontal" android:layout_width="fill_parent" android:layout_height="fill_parent">
         <TextView  android:layout_width="fill_parent" android:layout_height="wrap_content" android:background="#ff654321" android:layout_weight="1" android:text="1"/>
         <TextView  android:layout_width="fill_parent" android:layout_height="wrap_content" android:background="#fffedcba" android:layout_weight="2"  android:text="2"/>
     </LinearLayout>
 </LinearLayout>
FrameLayout:
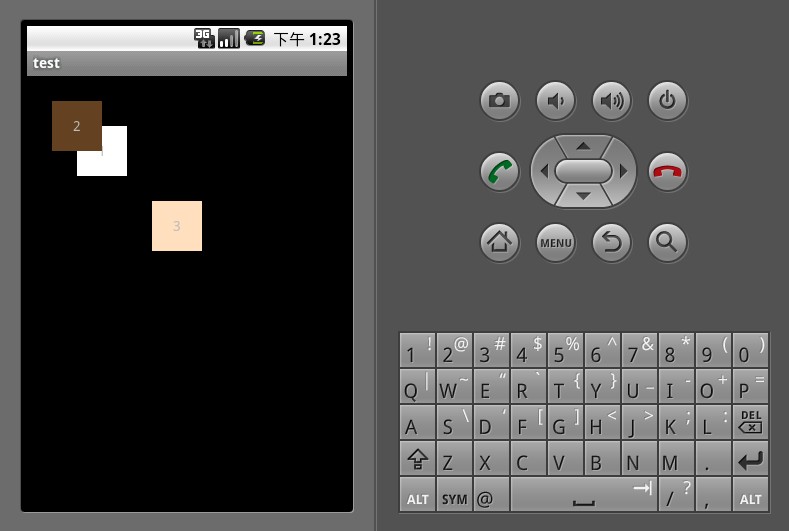
FrameLayout是五大布局中最简单的一个布局,在这个布局中,整个界面被当成一块空白备用区域,所有的子元素都不能被指定放置的位置,它们统统放于这块区域的左上角,并且后面的子元素直接覆盖在前面的子元素之上,将前面的子元素部分和全部遮挡。显示效果如下,第一个TextView被第二个TextView完全遮挡,第三个TextView遮挡了第二个TextView的部分位置。

<?xml version="1.0" encoding="utf-8"?>
 <FrameLayout xmlns:android="http://schemas.android.com/apk/res/android" android:orientation="vertical" android:layout_width="fill_parent" android:layout_height="fill_parent">
     <TextView android:layout_width="fill_parent" android:layout_height="fill_parent" android:background="#ff000000" android:gravity="center" android:text="1"/>
     <TextView android:layout_width="fill_parent" android:layout_height="fill_parent" android:background="#ff654321" android:gravity="center" android:text="2"/>
     <TextView android:layout_width="50dp" android:layout_height="50dp" android:background="#fffedcba" android:gravity="center" android:text="3"/>
 </FrameLayout>
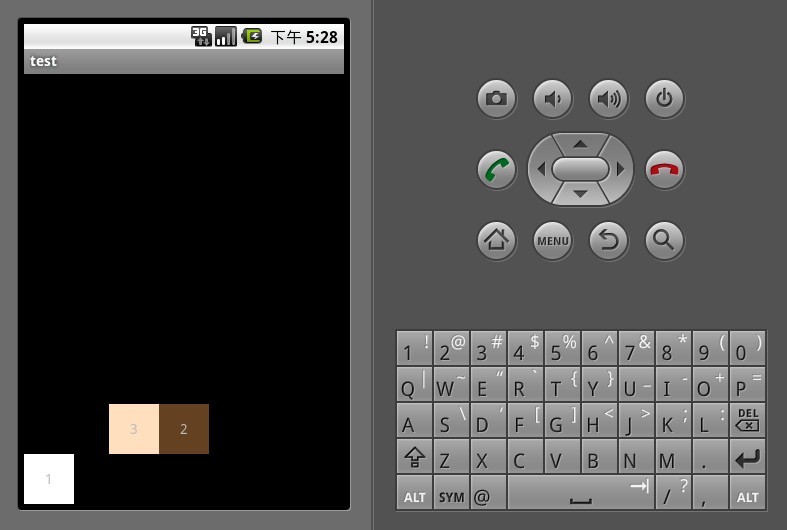
AbsoluteLayout:
AbsoluteLayout是绝对位置布局。在此布局中的子元素的android:layout_x和android:layout_y属性将生效,用于描述该子元素的坐标位置。屏幕左上角为坐标原点(0,0),第一个0代表横坐标,向右移动此值增大,第二个0代表纵坐标,向下移动,此值增大。在此布局中的子元素可以相互重叠。在实际开发中,通常不采用此布局格式,因为它的界面代码过于刚性,以至于有可能不能很好的适配各种终端。显示效果如下:
<?xml version="1.0" encoding="utf-8"?>
 <AbsoluteLayout xmlns:android="http://schemas.android.com/apk/res/android" android:orientation="vertical" android:layout_width="fill_parent" android:layout_height="fill_parent">
     <TextView android:layout_width="50dp" android:layout_height="50dp" android:background="#ffffffff" android:gravity="center" android:layout_x="50dp" android:layout_y="50dp" android:text="1"/>
     <TextView android:layout_width="50dp" android:layout_height="50dp" android:background="#ff654321" android:gravity="center" android:layout_x="25dp" android:layout_y="25dp" android:text="2"/>
     <TextView  android:layout_width="50dp" android:layout_height="50dp" android:background="#fffedcba" android:gravity="center" android:layout_x="125dp" android:layout_y="125dp" android:text="3"/>
 </AbsoluteLayout>
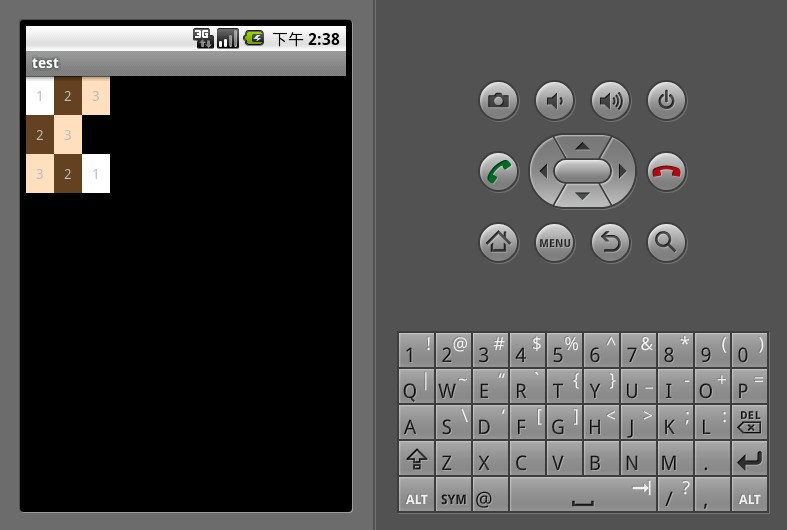
RelativeLayout:
RelativeLayout按照各子元素之间的位置关系完成布局。在此布局中的子元素里与位置相关的属性将生效。例如android:layout_below, android:layout_above等。子元素就通过这些属性和各自的ID配合指定位置关系。注意在指定位置关系时,引用的ID必须在引用之前,先被定义,否则将出现异常。
RelativeLayout里常用的位置属性如下:
android:layout_toLeftOf —— 该组件位于引用组件的左方
android:layout_toRightOf —— 该组件位于引用组件的右方
android:layout_above —— 该组件位于引用组件的上方
android:layout_below —— 该组件位于引用组件的下方
android:layout_alignParentLeft —— 该组件是否对齐父组件的左端
android:layout_alignParentRight —— 该组件是否齐其父组件的右端
android:layout_alignParentTop —— 该组件是否对齐父组件的顶部
android:layout_alignParentBottom —— 该组件是否对齐父组件的底部
android:layout_centerInParent —— 该组件是否相对于父组件居中
android:layout_centerHorizontal —— 该组件是否横向居中
android:layout_centerVertical —— 该组件是否垂直居中
RelativeLayout是Android五大布局结构中最灵活的一种布局结构,比较适合一些复杂界面的布局。下面示例就展示这么一个情况,第一个文本框与父组件的底部对齐,第二个文本框位于第一个文本框的上方,并且第三个文本框位于第二个文本框的左方。
<?xml version="1.0" encoding="utf-8"?>
 <RelativeLayout xmlns:android="http://schemas.android.com/apk/res/android" android:orientation="vertical" android:layout_width="fill_parent" android:layout_height="fill_parent">
     <TextView android:id="@+id/text_01" android:layout_width="50dp" android:layout_height="50dp" android:background="#ffffffff" android:gravity="center" android:layout_alignParentBottom="true" android:text="1"/>
     <TextView android:id="@+id/text_02" android:layout_width="50dp" android:layout_height="50dp" android:background="#ff654321" android:gravity="center" android:layout_above="@id/text_01" android:layout_centerHorizontal="true" android:text="2"/>
     <TextView android:id="@+id/text_03" android:layout_width="50dp" android:layout_height="50dp" android:background="#fffedcba" android:gravity="center" android:layout_toLeftOf="@id/text_02" android:layout_above="@id/text_01" android:text="3"/>
 </RelativeLayout>
TableLayout:
TableLayout顾名思义,此布局为表格布局,适用于N行N列的布局格式。一个TableLayout由许多TableRow组成,一个TableRow就代表TableLayout中的一行。
TableRow是LinearLayout的子类,它的android:orientation属性值恒为horizontal,并且它的android:layout_width和android:layout_height属性值恒为MATCH_PARENT和WRAP_CONTENT。所以它的子元素都是横向排列,并且宽高一致的。这样的设计使得每个TableRow里的子元素都相当于表格中的单元格一样。在TableRow中,单元格可以为空,但是不能跨列。
下面示例演示了一个TableLayout的布局结构,其中第二行只有两个单元格,而其余行都是三个单元格。
<?xml version="1.0" encoding="utf-8"?>
 <TableLayout xmlns:android="http://schemas.android.com/apk/res/android" android:orientation="vertical" android:layout_width="fill_parent" android:layout_height="fill_parent">
     <TableRow android:layout_width="fill_parent" android:layout_height="wrap_content">
         <TextView  android:background="#ffffffff" android:gravity="center" android:padding="10dp" android:text="1"/>
         <TextView android:background="#ff654321" android:gravity="center" android:padding="10dp" android:text="2"/>
         <TextView  android:background="#fffedcba" android:gravity="center" android:padding="10dp" android:text="3"/>
     </TableRow>
     <TableRow android:layout_width="fill_parent" android:layout_height="wrap_content">
         <TextView  android:background="#ff654321" android:gravity="center" android:padding="10dp" android:text="2"/>
         <TextView android:background="#fffedcba" android:gravity="center" android:padding="10dp" android:text="3"/>
     </TableRow>
     <TableRow android:layout_width="fill_parent" android:layout_height="wrap_content">
         <TextView android:background="#fffedcba" android:gravity="center" android:padding="10dp" android:text="3"/>
         <TextView  android:background="#ff654321" android:gravity="center" android:padding="10dp" android:text="2"/>
         <TextView  android:background="#ffffffff" android:gravity="center" android:padding="10dp" android:text="1"/>
     </TableRow>
 </TableLayout>